TurboSign API Integration
This comprehensive guide walks you through the TurboSign single-step API integration. Learn how to programmatically upload documents, configure recipients, set up signature fields, and send documents for electronic signatures using a single, streamlined API call.
Let an agent scaffold this for you
Install the TurboDocx Quickstart Skill and let Claude Code, Cursor, Copilot, Codex, or any agent that speaks the Agent Skills standard install the SDK, wire it into your app, and write a working TurboSign integration end-to-end.
$npx skills add TurboDocx/quickstart›/turbodocx-sdk turbosign
Overview
The TurboSign API provides a simplified single-step process to prepare documents for electronic signatures. Instead of multiple API calls, you can now accomplish everything in one request.
Two Endpoint Options
TurboSign offers two single-step endpoints to fit different workflows:
- Prepare for Review - Upload and get preview URL (no emails sent)
- Prepare for Signing - Upload and send immediately (emails sent)

Key Features
- Single API Call: Upload document, add recipients, and configure fields in one request
- RESTful API: Standard HTTP methods with multipart/form-data
- Bearer Token Authentication: Secure API access using JWT tokens
- Multiple Recipients: Support for multiple signers with custom signing order
- Flexible Field Placement: Position signature fields using anchors or coordinates
- Multiple File Sources: Upload file, or reference deliverableId, templateId, or fileLink
- Real-time Status Updates: Track document status throughout the signing process
- Webhook Integration: Receive notifications when signing is complete
We offer official SDKs that handle authentication, error handling, and type safety for you.
TLDR; Complete Working Example 🚀
Don't want to read all the details? Here's what you need to know:
Available Field Types
| Type | Description | Use Case |
|---|---|---|
signature | Electronic signature field | Legal signatures |
initial | Initial field | Document initials, paragraph acknowledgments |
date | Date picker field | Signing date, agreement date |
full_name | Full name field | Automatically fills signer's complete name |
first_name | First name field | Automatically fills signer's first name |
last_name | Last name field | Automatically fills signer's last name |
title | Title/job title field | Professional title or position |
company | Company name field | Organization or company name |
email | Email address field | Signer's email address |
text | Generic text input field | Custom text, notes, or any other text input |
checkbox | Checkbox field | Acknowledgments, consent, agreements |
Quick Start: Prepare for Signing (Most Common)
Use this endpoint to send documents immediately for signing:
Alternative: Prepare for Review
Use this endpoint when you need a preview URL to verify field placement:
Quick Comparison
| Feature | prepare-for-review | prepare-for-signing |
|---|---|---|
| Sends emails? | ❌ No | ✅ Yes |
| Returns preview URL? | ✅ Yes | ❌ No |
| Returns recipients? | ✅ Yes | ✅ Yes |
| Final status | REVIEW_READY | UNDER_REVIEW |
| Use when | Need to verify field placement | Ready to send immediately |
Now that you've seen the whole thing, let's dive into the details...
Prerequisites
Before you begin, ensure you have:
- API Access Token: Bearer token for authentication
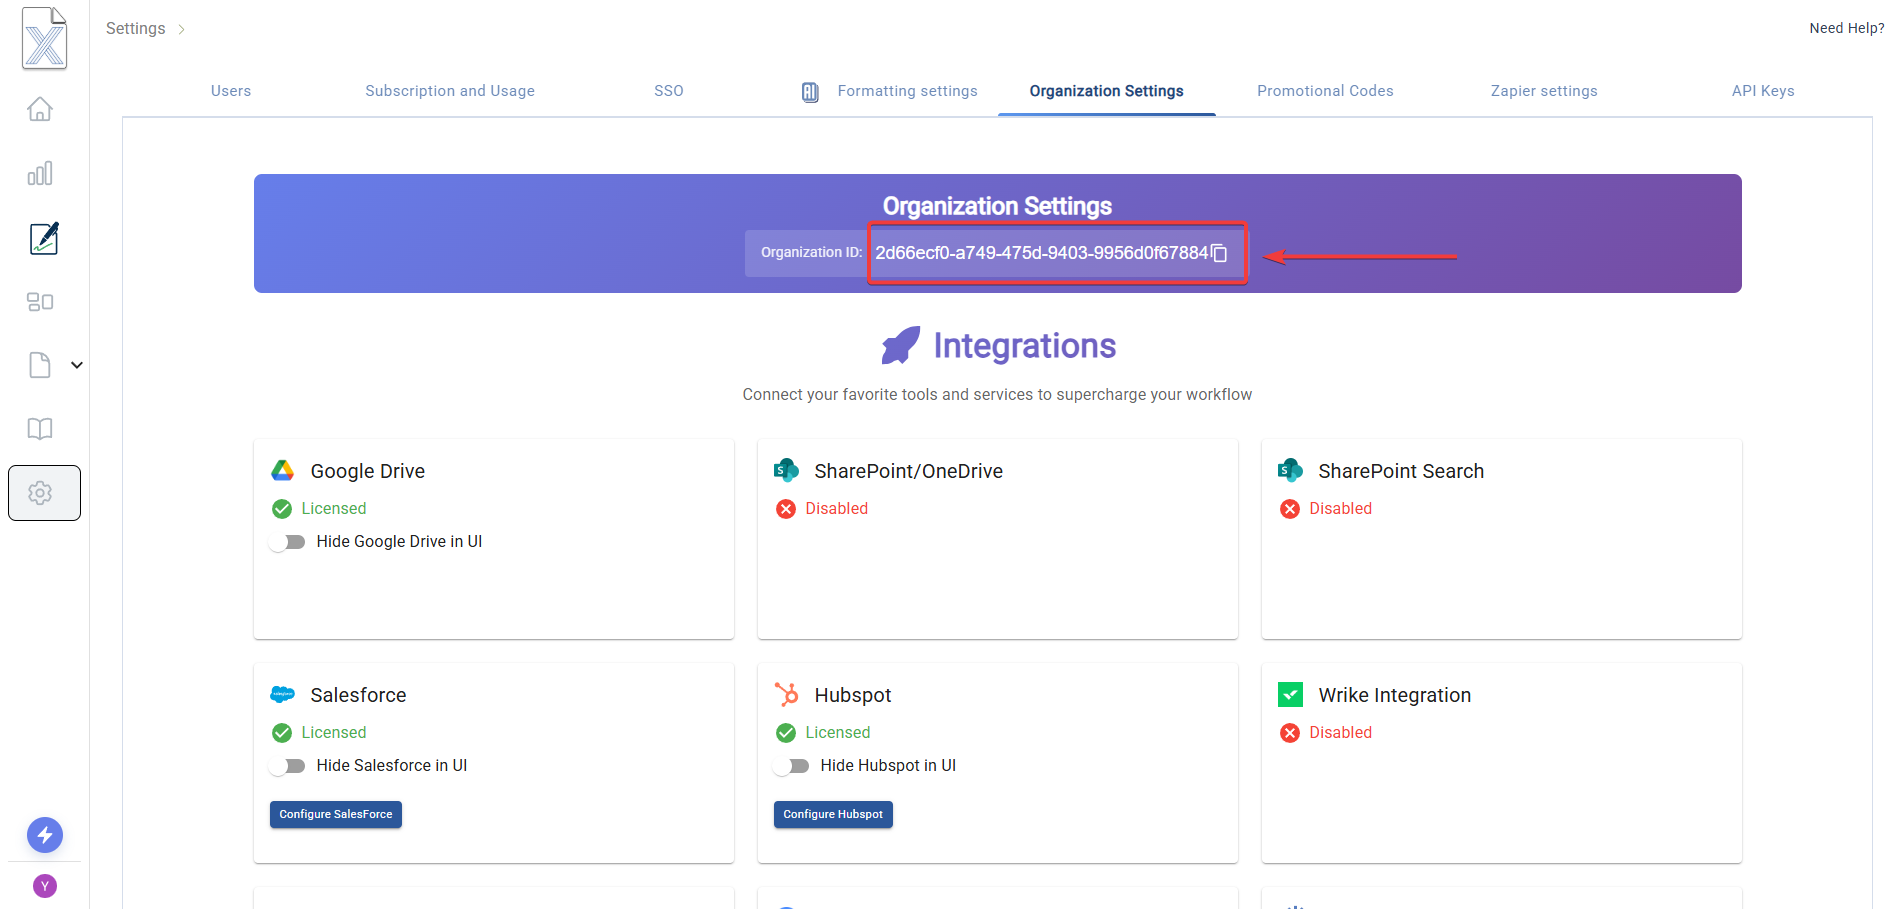
- Organization ID: Your organization identifier
- PDF Document: Document ready for signature collection
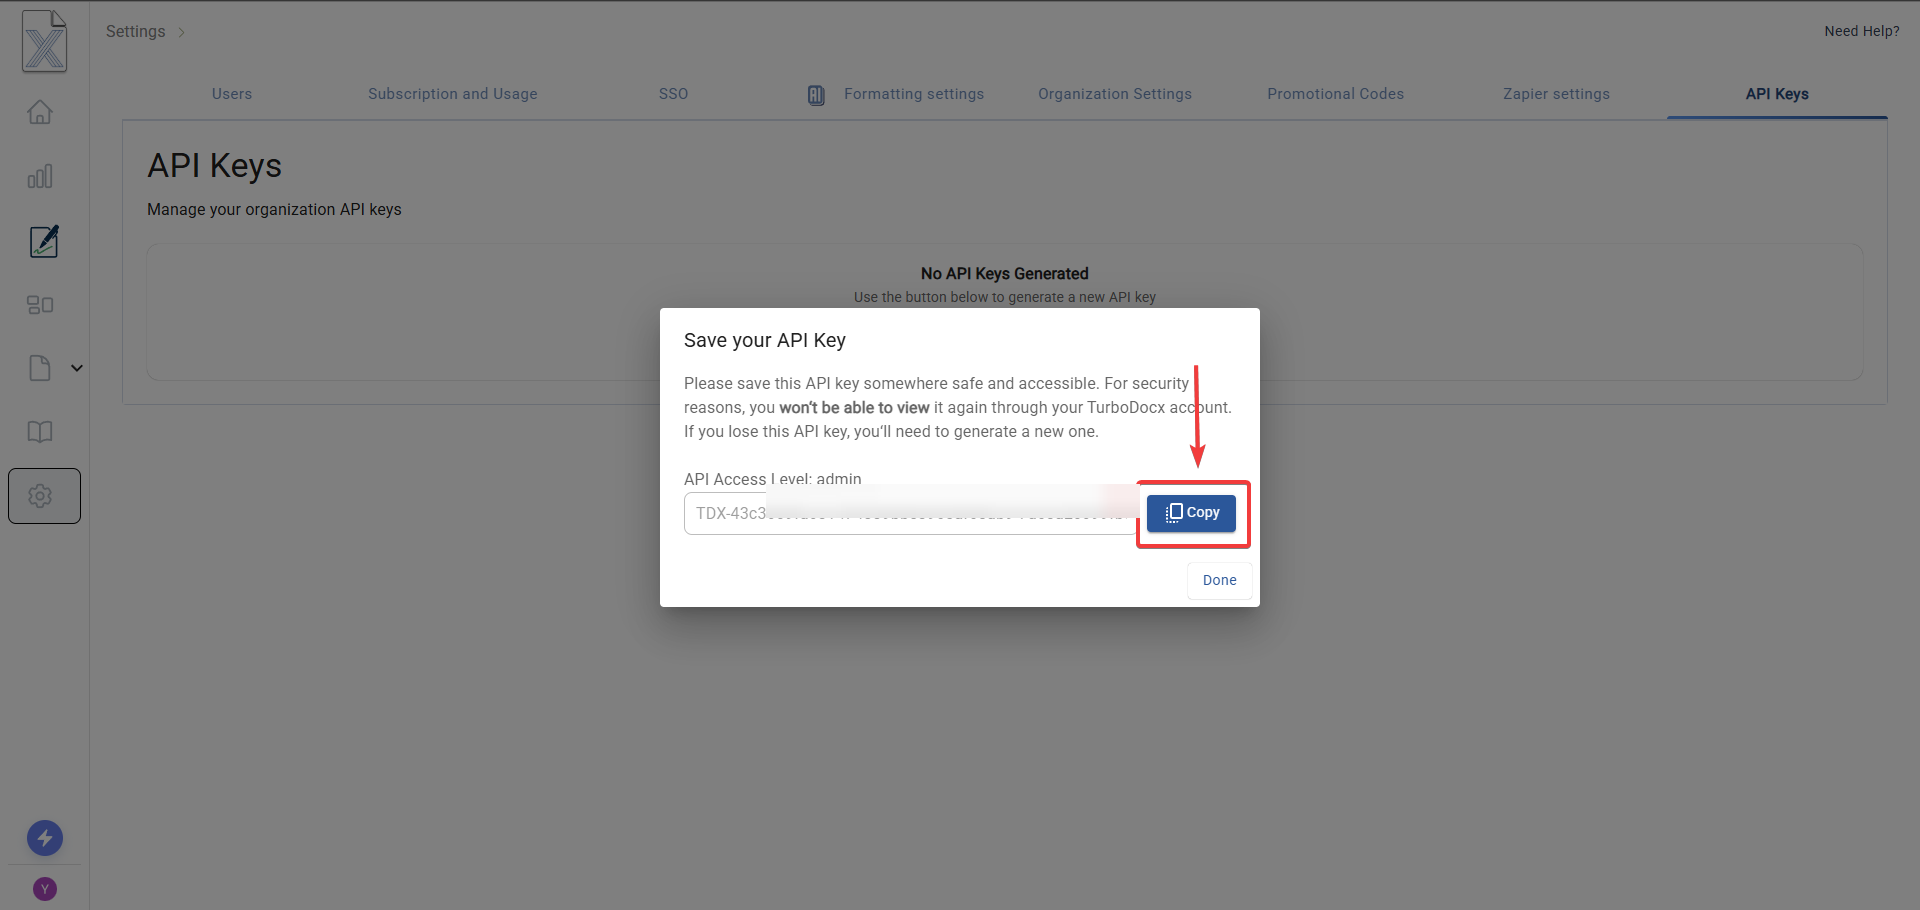
Getting Your Credentials
- Login to TurboDocx: Visit https://www.turbodocx.com
- Navigate to Settings: Access your organization settings
- API Keys Section: Generate or retrieve your API access token
- Organization ID: Copy your organization ID from the settings
Authentication
All TurboSign API requests require authentication using a Bearer token in the Authorization header:
Authorization: Bearer YOUR_API_TOKEN
Additional required headers for all requests:
x-rapiddocx-org-id: YOUR_ORGANIZATION_ID
User-Agent: TurboDocx API Client
Choosing Your Endpoint
TurboSign offers two single-step endpoints to fit different workflows. Choose the one that best matches your use case.
When to Use prepare-for-review
✅ Use this endpoint when you want to:
- Verify field placement before sending to recipients
- Get a preview URL to review the document in TurboSign's interface
- Manually trigger email sending after verifying field placement
- Ensure correct field positioning before recipients receive emails
Workflow: Upload → Get preview URL → Review in browser → Manually send when ready
When to Use prepare-for-signing
✅ Use this endpoint when you want to:
- Send documents immediately without preview step
- Automate the entire signature process end-to-end
- Use with verified templates or confident field positioning
- Skip manual review and send directly to recipients
Workflow: Upload → Emails sent automatically → Recipients sign
Endpoint 1: Prepare for Review
Creates a signature request and returns a preview URL. No emails are sent to recipients.
Endpoint
POST https://api.turbodocx.com/turbosign/single/prepare-for-review
Headers
Content-Type: multipart/form-data
Authorization: Bearer YOUR_API_TOKEN
x-rapiddocx-org-id: YOUR_ORGANIZATION_ID
User-Agent: TurboDocx API Client
Request Body (multipart/form-data)
⚠️ Important: Recipients and fields must be sent as JSON strings in form-data
| Field | Type | Required | Description |
|---|---|---|---|
| file | File | Conditional* | PDF, DOCX, or PPTX file to upload |
| deliverableId | String (UUID) | Conditional* | Reference to existing deliverable |
| templateId | String (UUID) | Conditional* | Reference to existing template |
| fileLink | String (URL) | Conditional* | URL to download file from |
| documentName | String | No | Document name in TurboSign (max 255 chars) |
| documentDescription | String | No | Document description (max 1000 chars) |
| recipients | String (JSON) | Yes | JSON string array of recipient objects |
| fields | String (JSON) | Yes | JSON string array of field objects |
| senderName | String | No | Name of sender (max 255 chars) |
| senderEmail | String (email) | No | Email of sender |
| ccEmails | String (JSON) | No | JSON string array of CC email addresses |
* File Source: Must provide exactly ONE of: file, deliverableId, templateId, or fileLink
Recipients JSON Format
Recipients must be stringified before adding to form-data:
const recipients = JSON.stringify([
  {
    name: "John Smith",
    email: "john.smith@company.com",
    signingOrder: 1,
    metadata: {
      color: "hsl(200, 75%, 50%)",
      lightColor: "hsl(200, 75%, 93%)",
    },
  },
  {
    name: "Jane Doe",
    email: "jane.doe@partner.com",
    signingOrder: 2,
    metadata: {
      color: "hsl(270, 75%, 50%)",
      lightColor: "hsl(270, 75%, 93%)",
    },
  },
]);
formData.append("recipients", recipients);
Fields JSON Format
Fields reference recipients by email (not recipientId) and must be stringified:
Template-based (recommended):
const fields = JSON.stringify([
  {
    recipientEmail: "john.smith@company.com",
    type: "signature",
    template: {
      anchor: "{Signature1}",
      placement: "replace",
      size: { width: 200, height: 80 },
      offset: { x: 0, y: 0 },
    },
    required: true,
  },
  {
    recipientEmail: "john.smith@company.com",
    type: "date",
    template: {
      anchor: "{Date1}",
      placement: "replace",
      size: { width: 150, height: 30 },
    },
    required: true,
  },
]);
formData.append("fields", fields);
Coordinate-based:
const fields = JSON.stringify([
  {
    recipientEmail: "john.smith@company.com",
    type: "signature",
    page: 1,
    x: 100,
    y: 200,
    width: 200,
    height: 80,
    pageWidth: 612,
    pageHeight: 792,
    required: true,
  },
]);
formData.append("fields", fields);
Response
{
  "success": true,
  "documentId": "4a20eca5-7944-430c-97d5-fcce4be24296",
  "status": "REVIEW_READY",
  "previewUrl": "https://www.turbodocx.com/sign/preview/abc123...",
  "recipients": [
    {
      "id": "5f673f37-9912-4e72-85aa-8f3649760f6b",
      "name": "John Smith",
      "email": "john.smith@company.com",
      "signingOrder": 1,
      "metadata": {
        "color": "hsl(200, 75%, 50%)",
        "lightColor": "hsl(200, 75%, 93%)"
      }
    }
  ],
  "message": "Document prepared for review. Use the preview URL to review and assign fields."
}
Response Fields
| Field | Type | Description |
|---|---|---|
| success | Boolean | Request success status |
| documentId | String (UUID) | Unique document identifier - save for tracking |
| status | String | Document status (REVIEW_READY) |
| previewUrl | String (URL) | URL to preview and verify document |
| recipients | Array | Array of recipient objects with generated IDs |
| message | String | Human-readable success message |
Code Examples
Next Steps After Review
Once you've reviewed the document via the preview URL click "Send for Signing" button on the preview page to send emails to recipients
Endpoint 2: Prepare for Signing
Creates a signature request and immediately sends emails to recipients. Use this for production workflows when you're confident in your field positioning.
Endpoint
POST https://api.turbodocx.com/turbosign/single/prepare-for-signing
Headers
Content-Type: multipart/form-data
Authorization: Bearer YOUR_API_TOKEN
x-rapiddocx-org-id: YOUR_ORGANIZATION_ID
User-Agent: TurboDocx API Client
Request Body (multipart/form-data)
The request format is identical to prepare-for-review. See the "Endpoint 1: Prepare for Review" section above for detailed field documentation.
Response
{
  "success": true,
  "documentId": "4a20eca5-7944-430c-97d5-fcce4be24296",
  "status": "UNDER_REVIEW",
  "recipients": [
    {
      "id": "5f673f37-9912-4e72-85aa-8f3649760f6b",
      "name": "John Smith",
      "email": "john.smith@company.com",
      "signingOrder": 1,
      "metadata": {
        "color": "hsl(200, 75%, 50%)",
        "lightColor": "hsl(200, 75%, 93%)"
      }
    }
  ],
  "message": "Document sent for signing. Emails are being sent to recipients."
}
Response Fields
| Field | Type | Description |
|---|---|---|
| success | Boolean | Request success status |
| documentId | String (UUID) | Unique document identifier - save for tracking |
| status | String | Document status (UNDER_REVIEW) |
| recipients | Array | Array of recipient objects with generated IDs |
| message | String | Human-readable success message |
⚠️ Note: This endpoint returns immediately after creating the document. Email sending happens asynchronously in the background. Use webhooks to receive notification when the document is fully signed.
Code Examples
If a recipient hasn't received or has lost their signing email, you can resend it using the Resend Email endpoint. You'll need the recipientIds from the response of this endpoint.
Endpoint 3: Download Signed Document
After a document has been signed by all recipients (status: COMPLETED), you can download the final signed PDF document.
Endpoint
GET https://api.turbodocx.com/turbosign/documents/{documentId}/download
Headers
Authorization: Bearer YOUR_API_TOKEN
x-rapiddocx-org-id: YOUR_ORGANIZATION_ID
User-Agent: TurboDocx API Client
Path Parameters
| Parameter | Type | Required | Description |
|---|---|---|---|
| documentId | String (UUID) | Yes | The unique identifier of the document |
Response
{
  "downloadUrl": "https://s3.amazonaws.com/bucket/path/to/document.pdf?X-Amz-...",
  "fileName": "Signed_Contract_2024.pdf"
}
Response Fields
| Field | Type | Description |
|---|---|---|
| downloadUrl | String | Presigned S3 URL to download the signed PDF (expires in 1 hour) |
| fileName | String | Original filename of the signed document |
This endpoint only returns a download URL when the document status is COMPLETED. If the document is still pending signatures, you will receive an error response.
Usage Notes
- The presigned URL expires after 1 hour. Request a new URL if the previous one has expired.
- The downloaded PDF includes all signatures embedded and is legally binding.
- For large documents, consider streaming the download rather than loading the entire file into memory.
Endpoint 4: Get Audit Trail
Retrieve the complete audit trail for a document, including all events and timestamps. The audit trail provides a tamper-evident record of all actions taken on the document using a cryptographic hash chain.
Endpoint
GET https://api.turbodocx.com/turbosign/documents/{documentId}/audit-trail
Headers
Authorization: Bearer YOUR_API_TOKEN
x-rapiddocx-org-id: YOUR_ORGANIZATION_ID
User-Agent: TurboDocx API Client
Path Parameters
| Parameter | Type | Required | Description |
|---|---|---|---|
| documentId | String (UUID) | Yes | The unique identifier of the document |
Response
{
  "data": {
    "document": {
      "id": "4a20eca5-7944-430c-97d5-fcce4be24296",
      "name": "Service Agreement 2024"
    },
    "auditTrail": [
      {
        "id": "entry-uuid-1",
        "documentId": "4a20eca5-7944-430c-97d5-fcce4be24296",
        "actionType": "prepared_for_review",
        "timestamp": "2024-01-15T10:30:00.000Z",
        "previousHash": null,
        "currentHash": "a1b2c3d4e5f6...",
        "createdOn": "2024-01-15T10:30:00.000Z",
        "details": {
          "ipAddress": "192.168.1.100",
          "userAgent": "Mozilla/5.0..."
        },
        "user": {
          "name": "Admin User",
          "email": "admin@company.com"
        },
        "userId": "user-uuid-1"
      },
      {
        "id": "entry-uuid-2",
        "documentId": "4a20eca5-7944-430c-97d5-fcce4be24296",
        "actionType": "document_sent",
        "timestamp": "2024-01-15T10:31:00.000Z",
        "previousHash": "a1b2c3d4e5f6...",
        "currentHash": "b2c3d4e5f6g7...",
        "createdOn": "2024-01-15T10:31:00.000Z",
        "details": {
          "recipientCount": 2
        },
        "user": {
          "name": "Admin User",
          "email": "admin@company.com"
        },
        "userId": "user-uuid-1"
      },
      {
        "id": "entry-uuid-3",
        "documentId": "4a20eca5-7944-430c-97d5-fcce4be24296",
        "actionType": "document_viewed",
        "timestamp": "2024-01-15T11:00:00.000Z",
        "previousHash": "b2c3d4e5f6g7...",
        "currentHash": "c3d4e5f6g7h8...",
        "createdOn": "2024-01-15T11:00:00.000Z",
        "details": {
          "ipAddress": "10.0.0.50"
        },
        "recipient": {
          "name": "John Smith",
          "email": "john.smith@company.com"
        },
        "recipientId": "recipient-uuid-1"
      },
      {
        "id": "entry-uuid-4",
        "documentId": "4a20eca5-7944-430c-97d5-fcce4be24296",
        "actionType": "document_signed",
        "timestamp": "2024-01-15T11:05:00.000Z",
        "previousHash": "c3d4e5f6g7h8...",
        "currentHash": "d4e5f6g7h8i9...",
        "createdOn": "2024-01-15T11:05:00.000Z",
        "details": {
          "signatureType": "electronic",
          "ipAddress": "10.0.0.50"
        },
        "recipient": {
          "name": "John Smith",
          "email": "john.smith@company.com"
        },
        "recipientId": "recipient-uuid-1"
      }
    ]
  }
}
Response Fields
Document Object
| Field | Type | Description |
|---|---|---|
| id | String (UUID) | Document identifier |
| name | String | Document name |
Audit Trail Entry Object
| Field | Type | Description |
|---|---|---|
| id | String (UUID) | Unique identifier for the audit entry |
| documentId | String (UUID) | Document this entry belongs to |
| actionType | String | Type of action (see Action Types below) |
| timestamp | String (ISO) | When the action occurred |
| previousHash | String | Hash of the previous entry (null for first entry) |
| currentHash | String | Hash of this entry (forms hash chain) |
| createdOn | String (ISO) | When the entry was created |
| details | Object | Additional action-specific details |
| user | Object | User who performed action (for sender actions) |
| userId | String (UUID) | User ID (when applicable) |
| recipient | Object | Recipient who performed action (for signer actions) |
| recipientId | String (UUID) | Recipient ID (when applicable) |
Action Types
| Action Type | Description |
|---|---|
prepared_for_review | Document was uploaded and prepared for review |
document_sent | Document was sent to recipients for signing |
document_viewed | Recipient opened/viewed the document |
document_signed | Recipient signed the document |
document_voided | Document was voided/cancelled |
document_resent | Reminder/resend email was sent to recipient |
email_notification_sent | Signing invitation email was sent |
cc_email_notification_sent | CC notification email was sent |
Hash Chain Verification
The audit trail uses a cryptographic hash chain for tamper-evidence:
- Each entry's
currentHashis computed from the entry data plus thepreviousHash - The first entry has
previousHash: null - To verify integrity, recompute each hash and compare
- Any modification to historical entries would break the chain
This provides strong evidence that the audit trail has not been tampered with after creation.
Usage Notes
- The audit trail is available at any document status (not just completed documents)
- All timestamps are in ISO 8601 format (UTC timezone)
- The
detailsobject varies by action type and may contain IP addresses, user agents, and other contextual information - Audit trail entries are immutable and cannot be modified or deleted
Endpoint 5: Resend Email
Resend signature request emails to one or more recipients who haven't yet completed signing. Only recipients at the current signing order who haven't completed are eligible for resend.
This applies to documents that have already been sent for signing — there must be an original invitation to resend. A document still in review (no signing emails sent yet) has no eligible recipients.
Endpoint
POST https://api.turbodocx.com/turbosign/documents/{documentId}/resend-email
Headers
Content-Type: application/json
Authorization: Bearer YOUR_API_TOKEN
x-rapiddocx-org-id: YOUR_ORGANIZATION_ID
User-Agent: TurboDocx API Client
Path Parameters
| Parameter | Type | Required | Description |
|---|---|---|---|
| documentId | String (UUID) | Yes | The unique identifier of the document |
Request Body (JSON)
| Field | Type | Required | Description |
|---|---|---|---|
| recipientIds | Array (UUID[]) | Yes | Array of recipient UUIDs to resend emails to (min 1, unique) |
{
  "recipientIds": [
    "5f673f37-9912-4e72-85aa-8f3649760f6b",
    "7a891c23-4d56-4e78-9abc-def012345678"
  ]
}
Recipient IDs are returned in the response of the Prepare for Review (Endpoint 1) and Prepare for Signing (Endpoint 2) endpoints. Save these IDs when creating your signature request.
Response
{
  "data": {
    "success": true,
    "recipientCount": 2
  }
}
Response Fields
| Field | Type | Description |
|---|---|---|
| data.success | Boolean | Whether the resend was successful |
| data.recipientCount | Number | Number of recipients who received the email |
Error Responses
| Status | Error Message | Cause |
|---|---|---|
| 404 | "Document not found" | Document doesn't exist, has been deleted, or belongs to another organization |
| 400 | "All recipients have already completed signing" | No eligible recipients remain |
| 400 | "Some recipients are not eligible for email resend at this time" | Requested recipients aren't at the current signing order or already completed |
The 400 "not eligible" error also returns an invalidRecipientIds array showing which IDs were rejected:
{
  "error": "Some recipients are not eligible for email resend at this time",
  "invalidRecipientIds": ["7a891c23-4d56-4e78-9abc-def012345678"]
}
To recover, retry the request without the listed IDs, or wait until those recipients reach the current signing order before resending to them.
Usage Notes
- Only recipients at the current signing order who haven't completed signing are eligible for resend. If your document uses sequential signing (signingOrder 1, 2, 3...), that means the current active step only.
- The request is all-or-nothing: if any requested ID is ineligible, the whole request is rejected with a 400 and no emails are sent. Fix the
recipientIdsand retry. - Each resend creates a
document_resententry in the audit trail for tracking - The
recipientIdsarray must contain at least one ID and all IDs must be unique UUIDs
Recipients Reference
Recipient Properties
Each recipient object in the recipients array should contain the following properties:
| Property | Type | Required | Description |
|---|---|---|---|
| name | String | Yes | Full name of the recipient/signer |
| String (email) | Yes | Email address of the recipient (must be unique) | |
| signingOrder | Number | Yes | Order in which recipient should sign (starts at 1) |
| metadata | Object | No | Optional metadata for UI customization (color, lightColor) |
Metadata Object (Optional)
The metadata object allows you to customize the recipient's UI appearance:
| Property | Type | Description | Example |
|---|---|---|---|
| color | String | Primary color for recipient in HSL format | "hsl(200, 75%, 50%)" |
| lightColor | String | Light background color for recipient in HSL format | "hsl(200, 75%, 93%)" |
Example Recipients Array
[
  {
    "name": "John Smith",
    "email": "john.smith@company.com",
    "signingOrder": 1
  },
  {
    "name": "Jane Doe",
    "email": "jane.doe@partner.com",
    "signingOrder": 2
  }
]
With Optional Metadata
[
  {
    "name": "John Smith",
    "email": "john.smith@company.com",
    "signingOrder": 1,
    "metadata": {
      "color": "hsl(200, 75%, 50%)",
      "lightColor": "hsl(200, 75%, 93%)"
    }
  }
]
Field Types Reference
Complete Field Type List
| Type | Description | Auto-filled | Use Case |
|---|---|---|---|
signature | Electronic signature field | No | Legal signatures, agreements |
initial | Initial field | No | Document initials, paragraph acknowledgments |
date | Date picker field | No | Signing date, agreement date |
full_name | Full name field | Yes | Automatically fills signer's complete name |
first_name | First name field | Yes | Automatically fills signer's first name |
last_name | Last name field | Yes | Automatically fills signer's last name |
title | Title/job title field | No | Professional title or position |
company | Company name field | No | Organization or company name |
email | Email address field | Yes | Signer's email address |
text | Generic text input field | No | Custom text, notes, or any other text input |
checkbox | Checkbox field | No | Acknowledgments, consent, agreements |
Field Configuration Properties
Common Properties (All Field Types)
| Property | Type | Required | Description |
|---|---|---|---|
| recipientEmail | String | Yes | Email address of recipient (matches email in recipients array) |
| type | String | Yes | Field type (see table above) |
| required | Boolean | No | Whether field must be completed (default: true) |
| defaultValue | String | No | Pre-filled value for the field |
| isReadonly | Boolean | No | Makes field non-editable (for prefilled values) |
| backgroundColor | String | No | Custom background color (hex or rgba) |
Template-based Properties
| Property | Type | Required | Description |
|---|---|---|---|
| template.anchor | String | Yes | Text anchor to find in document (e.g., {Signature1}) |
| template.placement | String | Yes | How to place field: "replace", "before", "after" |
| template.size | Object | Yes | Field dimensions: { width: number, height: number } |
| template.offset | Object | No | Position offset: { x: number, y: number } (default: {x:0, y:0}) |
| template.caseSensitive | Boolean | No | Whether anchor search is case-sensitive (default: true) |
| template.useRegex | Boolean | No | Whether to treat anchor as regex pattern (default: false) |
Coordinate-based Properties
| Property | Type | Required | Description |
|---|---|---|---|
| page | Number | Yes | Page number (starts at 1) |
| x | Number | Yes | Horizontal position from left edge (pixels) |
| y | Number | Yes | Vertical position from top edge (pixels) |
| width | Number | Yes | Field width in pixels |
| height | Number | Yes | Field height in pixels |
| pageWidth | Number | No | Total page width in pixels (optional, for responsive positioning) |
| pageHeight | Number | No | Total page height in pixels (optional, for responsive positioning) |
Field Type Special Behaviors
signature & initial
- Draws a signature pad for user input
- Can be text-based or drawn
- Cryptographically signed and hashed for legal validity
date
- Shows date picker interface
- Format: MM/DD/YYYY (US) or DD/MM/YYYY (configurable)
- Can set defaultValue to "today" for auto-population
full_name, first_name, last_name, email
- Auto-populated from recipient profile
- Can be overridden by recipient if needed
- Useful for legal compliance and form filling
text
- Single-line text input by default
- Supports defaultValue for prefilled content
- Use for titles, company names, custom fields
checkbox
- Boolean true/false value
- Useful for acknowledgments and consent
- Can have label text next to checkbox
Field Positioning Methods
TurboSign supports two methods for positioning signature fields in your documents.
Method 1: Template-based Positioning (Recommended)
Uses text anchors in your PDF as placeholders. TurboSign searches for these anchors and places fields accordingly.
Advantages
✅ Easy to update field positions (just edit the PDF) ✅ No need to measure exact coordinates ✅ Works across different page sizes ✅ More maintainable for non-technical users ✅ Handles document variations gracefully
How it Works
- Add anchor text to your PDF: Place text like
{Signature1},{Date1},{Initial1}where you want fields - Configure fields with anchor references: Tell TurboSign what to search for
- TurboSign finds and replaces: Anchors are found and replaced with interactive fields
Anchor Configuration Example
{
  "recipientEmail": "john.smith@company.com",
  "type": "signature",
  "template": {
    "anchor": "{Signature1}",
    "placement": "replace",
    "size": { "width": 200, "height": 80 },
    "offset": { "x": 0, "y": 0 },
    "caseSensitive": true,
    "useRegex": false
  },
  "required": true
}
Placement Options
- replace: Removes the anchor text and places the field in its position
- before: Places field before the anchor text (anchor remains visible)
- after: Places field after the anchor text (anchor remains visible)
Offset Usage
Offset allows fine-tuning field position relative to the anchor:
x: Positive moves right, negative moves left (pixels)y: Positive moves down, negative moves up (pixels)
{
  "anchor": "{Signature1}",
  "placement": "replace",
  "size": { "width": 200, "height": 80 },
  "offset": { "x": 10, "y": -5 } // 10px right, 5px up from anchor
}
Method 2: Coordinate-based Positioning
Uses exact pixel coordinates to position fields on specific pages. Best for precise control or when anchors aren't feasible.
Advantages
✅ Pixel-perfect precision ✅ Works with PDFs that can't be edited ✅ Programmatically generated positions ✅ Useful for form-filling scenarios ✅ Consistent placement across documents
How it Works
- Measure exact x,y coordinates in your PDF (using PDF editor or viewer)
- Provide page number, coordinates, and dimensions
- TurboSign places fields at exact positions
Coordinate Configuration Example
{
  "recipientEmail": "john.smith@company.com",
  "type": "signature",
  "page": 1,
  "x": 100,
  "y": 200,
  "width": 200,
  "height": 80,
  "pageWidth": 612,
  "pageHeight": 792,
  "required": true
}
Coordinate System Reference
- Origin (0,0): Top-left corner of the page
- X-axis: Increases from left to right
- Y-axis: Increases from top to bottom
- Standard US Letter: 612 x 792 pixels (8.5" x 11" at 72 DPI)
- Standard A4: 595 x 842 pixels (210mm x 297mm at 72 DPI)
Coordinate Validation
Fields must stay within page boundaries:
x ≥ 0y ≥ 0x + width ≤ pageWidthy + height ≤ pageHeight
Measuring Coordinates
Adobe Acrobat Pro:
- View → Show/Hide → Rulers & Grids → Rulers
- Hover over location to see coordinates
Browser Developer Tools:
- Open PDF in browser
- Right-click → Inspect
- Use element inspector to measure positions
PDF Editing Software:
- Use built-in coordinate display
- Draw rectangles to measure dimensions
Quick Coordinate Example
Position a signature field at bottom-right of a US Letter page:
{
  "recipientEmail": "john@example.com",
  "type": "signature",
  "page": 1,
  "x": 362, // 612 - 250 = 362 (right aligned with 50px margin)
  "y": 662, // 792 - 130 = 662 (bottom aligned with 50px margin)
  "width": 200,
  "height": 80,
  "pageWidth": 612,
  "pageHeight": 792
}
Best Practices
Workflow Selection
When You Need Field Verification:
- ✅ Use
prepare-for-reviewto get preview URLs - ✅ Verify field placement in browser before sending
- ✅ Manually trigger sending after review
- ✅ Useful for new document templates or complex field layouts
When Field Placement Is Verified:
- ✅ Use
prepare-for-signingto send immediately - ✅ Implement webhook handlers for completion notifications
- ✅ Use proper error handling and retry logic
- ✅ Monitor API rate limits
- ✅ Log all document IDs for tracking
General Tips:
- ✅ Use deliverableId or templateId to avoid repeated uploads
- ✅ Test with your own email addresses first
- ✅ Both endpoints are production-ready
Security
- Never expose API tokens: Store tokens securely in environment variables or secrets management
- Use HTTPS only: All API calls must use HTTPS in production (API enforces this)
- Validate inputs: Always validate recipient emails and document names before submission
- Implement rate limiting: Respect API rate limits to avoid throttling
- Rotate tokens regularly: Generate new API tokens periodically
- Use webhook signatures: Verify webhook payloads using HMAC signatures
- Sanitize user inputs: Validate and sanitize all user-provided data
Error Handling
- Check HTTP status codes: Always verify response status before processing
- Handle timeouts: Implement retry logic with exponential backoff for network failures
- Log API responses: Keep detailed logs for debugging and monitoring
- Validate responses: Check response structure before accessing data
- Graceful degradation: Have fallback behavior for API failures
- User-friendly errors: Display helpful error messages to end users
Performance
File Upload Optimization:
- Compress PDFs when possible (aim for <5MB)
- Use fileLink for files already in cloud storage (S3, GCS, etc.)
- Use deliverableId/templateId to reference existing documents
- Avoid uploading the same document multiple times
API Efficiency:
- Single-step endpoints reduce API calls from 3 to 1 (3x faster)
- Batch multiple documents in parallel requests when possible
- Use connection pooling for multiple requests
- Implement exponential backoff for retries
- Cache responses when appropriate
Network Optimization:
- Use CDN for document hosting when using fileLink
- Enable gzip compression for API requests
- Minimize payload sizes by only including required fields
Document Preparation
Text Anchors (Template-based):
- Use consistent anchor naming:
{FieldType}{Number}(e.g.,{Signature1},{Date1}) - Place anchors exactly where you want fields
- Use unique anchors (avoid duplicates)
- Test anchor placement with prepare-for-review first
- Document your anchor naming convention
Coordinate-based:
- Verify coordinates work across different PDF viewers
- Account for page margins and headers/footers
- Use standard page sizes when possible
- Test on actual page dimensions (don't assume)
- Validate boundaries before submission
Document Validation:
- Ensure PDFs are not password-protected or corrupted
- Verify all pages are readable
- Test with actual documents before production
- Keep backup copies of source documents
JSON String Formatting
⚠️ Critical: Recipients and fields must be valid JSON strings when added to form-data.
Correct:
const recipients = JSON.stringify([
  { name: "John", email: "john@example.com", signingOrder: 1 },
]);
formData.append("recipients", recipients);
Incorrect:
// Don't send object/array directly!
formData.append("recipients", recipientsArray); // ❌ Wrong
formData.append("recipients", "[{...}]"); // ❌ Wrong (string literal, not stringified)
Python Example:
import json
recipients = json.dumps([
    {"name": "John", "email": "john@example.com", "signingOrder": 1}
])
form_data['recipients'] = recipients
C# Example:
using System.Text.Json;
var recipients = JsonSerializer.Serialize(new[] {
    new { name = "John", email = "john@example.com", signingOrder = 1 }
});
formData.Add(new StringContent(recipients), "recipients");
Error Handling & Troubleshooting
Common HTTP Status Codes
| Status Code | Description | Solution |
|---|---|---|
200 | Success | Request completed successfully |
400 | Bad Request | Check request body format and required fields |
401 | Unauthorized | Verify API token and headers |
403 | Forbidden | Check organization ID and permissions |
404 | Not Found | Verify endpoint URLs are correct |
422 | Unprocessable Entity | Validate field values and constraints |
429 | Too Many Requests | Implement rate limiting and retry logic |
500 | Internal Server Error | Contact support if persistent |
Common Issues
JSON String Formatting Errors
Symptoms: 400 Bad Request with message "Invalid JSON in recipients/fields"
Solutions:
- ✅ Verify JSON.stringify() or equivalent is used for recipients, fields, ccEmails
- ✅ Check JSON is valid using JSONLint or similar validator
- ✅ Ensure proper escaping of quotes in JSON strings
- ✅ Test with minimal example first (1 recipient, 1 field)
Example Error Response:
{
  "error": "Invalid JSON string in recipients field",
  "code": "JSONParseError",
  "details": "Unexpected token at position 45"
}
Debug Steps:
- Log the JSON string before sending
- Validate JSON with online validator
- Check for special characters or unescaped quotes
- Test with hardcoded valid JSON first
File Source Errors
Symptoms: 400 Bad Request with message about file source
Solutions:
- ✅ Provide exactly ONE of: file, deliverableId, templateId, fileId, fileLink
- ✅ Verify UUIDs are valid format (8-4-4-4-12 characters)
- ✅ Check file upload isn't corrupted or empty
- ✅ Ensure fileLink is accessible (not behind auth)
Example Error Response:
{
  "error": "Must provide exactly one file source",
  "code": "InvalidFileSource"
}
Recipients/Fields Mismatch
Symptoms: 400 Bad Request about missing recipient or email mismatch
Solutions:
- ✅ Verify recipientEmail in fields matches email in recipients array exactly
- ✅ Check for typos in email addresses
- ✅ Ensure all fields reference valid recipients
- ✅ Email matching is case-sensitive
Example:
// Recipients array
[{ email: "john.smith@company.com", ... }]

// Fields array - must match exactly
[{ recipientEmail: "john.smith@company.com", ... }]  // ✅ Correct
[{ recipientEmail: "John.Smith@company.com", ... }]  // ❌ Wrong (case mismatch)
Authentication Failures
Symptoms: 401 Unauthorized responses
Solutions:
- ✅ Verify API token is correct and not expired
- ✅ Check that
x-rapiddocx-org-idheader matches your organization - ✅ Ensure Bearer token format:
Bearer YOUR_TOKEN(with space) - ✅ Confirm token has necessary permissions
Example Correct Headers:
Authorization: Bearer eyJhbGciOiJIUzI1NiIsInR5cCI6IkpXVCJ9...
x-rapiddocx-org-id: a1b2c3d4-e5f6-7890-abcd-ef1234567890
Document Upload Failures
Symptoms: Upload returns error or times out
Solutions:
- ✅ Verify PDF file is not corrupted or password-protected
- ✅ Check file size is under maximum limit (typically 10MB)
- ✅ Ensure file is actually a PDF (check MIME type)
- ✅ Verify network connection and try again
- ✅ For fileLink, ensure URL is accessible
Field Positioning Problems
Symptoms: Signature fields appear in wrong locations or not at all
Template-based Solutions:
- ✅ Verify anchor text exists in the PDF document
- ✅ Check anchor text matches exactly (case-sensitive by default)
- ✅ Test with
caseSensitive: falseif having matching issues - ✅ Try different placement options (replace, before, after)
- ✅ Use prepare-for-review to visually verify placement
Coordinate-based Solutions:
- ✅ Verify page dimensions match your PDF's actual size
- ✅ Check that x,y coordinates are within page boundaries
- ✅ Ensure coordinates account for any PDF margins or headers
- ✅ Test with different page numbers if multi-page document
- ✅ Validate that
x + width ≤ pageWidthandy + height ≤ pageHeight
Webhook Integration Issues
Symptoms: Not receiving completion notifications
Solutions:
- ✅ Verify webhook URLs are accessible and return 200 OK
- ✅ Check webhook configuration in organization settings
- ✅ Review webhook delivery history for error details
- ✅ Test webhook endpoints with external tools (webhook.site, ngrok)
- ✅ Implement HMAC signature verification
Debugging Tips
- Test with prepare-for-review first: Visual confirmation before sending emails
- Use preview URLs: Verify field placement and document appearance
- Check response documentId: Save this for tracking and debugging
- Enable request logging: Log all requests and responses with timestamps
- Test with minimal payloads: Start simple (1 recipient, 1 field), add complexity incrementally
- Validate JSON before sending: Use JSON validators to check format
- Use Postman/Insomnia: Test manually before writing code
- Check API status page: Verify TurboDocx services are operational
- Review error messages carefully: Error responses include specific details
- Monitor rate limits: Track API usage to avoid throttling
Example Debug Request
# Test with curl to isolate issues
curl -X POST https://api.turbodocx.com/turbosign/single/prepare-for-review \
  -H "Authorization: Bearer YOUR_TOKEN" \
  -H "x-rapiddocx-org-id: YOUR_ORG_ID" \
  -F "file=@document.pdf" \
  -F "documentName=Test Document" \
  -F 'recipients=[{"name":"Test User","email":"test@example.com","signingOrder":1}]' \
  -F 'fields=[{"recipientEmail":"test@example.com","type":"signature","page":1,"x":100,"y":200,"width":200,"height":80,"pageWidth":612,"pageHeight":792}]' \
  -v
Next Steps
Webhooks - The Next Logical Step
Now that you've integrated the single-step signing flow, the next step is setting up webhooks to receive real-time notifications when documents are signed. This eliminates the need for polling and provides instant updates about document status changes.
📖 Learn how to configure Webhooks →
Related Documentation
Support
Need help with your integration?
- Discord Community: Join our Discord server for real-time support and discussions
- Documentation: https://docs.turbodocx.com
Ready to get started? Follow the guide above to integrate TurboSign single-step API into your application and start collecting electronic signatures programmatically with a single API call!